a guide to roll label selection for printing

A Guide to Roll Label Selection for Printing

LABELS FOR ROLL LABEL PRINTERS
For those new to or inexperienced in the ordering of plain labels for roll label printers this article is intended to help with some key issues and ensure that the correct label material and size are ordered, the diameter of the label roll/s fit in the printer and that the printer sensors can detect the labels to be printed.
PRINTERS
There are currently two types of printers manufactured specifically for the printing of pre-cut labels, which are Inkjet and Thermal printer technologies. There are some Laser (dry toner) printers for the printing of rolls as well as flat sheet format, but these are pre-conversion, reel-to-reel format and not for post conversion, pre-cut labels.
Inkjet Printers
This technology produces image and text on the labels using aqueous ink in a dye or pigment format.
Since their introduction in the latter-half of the 1980’s, inkjet printers have grown in popularity
and performance.

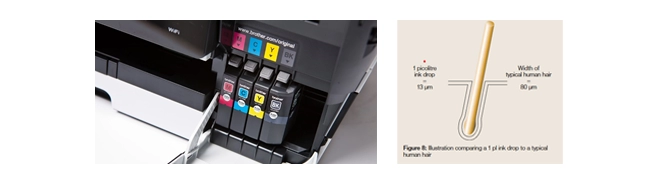
An inkjet label printer is any printer that places extremely small droplets of ink onto a paper or Polymer label to create an image. The dots of ink are extremely small (in desktop printers, usually between 50 and 60 microns in diameter), so small that they are less than the diameter of a human hair (80 microns). The amount of ink dispensed by the print heads is measured in Picolitres (1 Trillionth of a litre) and in larger commercial inkjet printers the number of Picolitres dispensed varies by printhead nozzle, typically from 6 – 11 Picolitres, but in desktop printers the printhead nozzles are commonly a standard 75 microns. This enables a very precise positioning of ink dots, with resolutions of up to 1,440 x 720 dots per inch (DPI). The dots deposited from the ink cartridges are typically CMYK in desktop printers and combine colours together in varying quantities of these minute dots to create photo-quality images.
Inks are either dye based which consist of a colourant that is fully dissolved and suspended in liquid or a pigment ink which consists of a very fine powder of solid colourant particles suspended in a liquid carrier. The main difference between dyes and pigments is the particle size and therefore dyes are not UV stable whereas pigments are usually UV stable.
Label Materials for Inkjet Printers
Because inkjet printers dispense wet ink onto the label surface (face-stock) the ink requires time to dry through surface absorption and evaporation. Plain label face-stocks, with absorption capabilities therefore work best with inkjet printers i.e. uncoated matt papers.
Coated papers, such as semi-gloss, gloss and high gloss, along with Polymers will generally not work well with desktop inkjet printers as the surface coating in the case of paper and the material composition of Polymers will prevent absorption and without heated dryer’s in the printer, evaporation will not compensate. Leaving the printed labels at risk of smudging as they emerge from the printer.
The solution is to coat the gloss finish papers and Polymers with a chemical that reacts with the ink and dries the ink. Therefore, when selecting a paper label with a gloss finish or a Polymer label i.e. Polyester, Polyethylene or Polypropylene always be sure that there is an “Inkjet” version of the label material available.
Inkjet – Label Material Options
Sheet Formats (A4, A3 & SRA3)
Paper
| # | Product Code | Material Description |
|---|---|---|
| 1 | WTP | Matt White/Permanent Adhesive |
| 2 | WTSP | Matt White/Super Permanent Adhesive |
| 3 | WTR | Matt White/Removable Adhesive |
| 4 | RWP | Recycled Matt White/Permanent Adhesive |
| 5 | CSC | Luxury White/Permanent Adhesive |
| 6 | MOP | Block-out/Cover-Up – Matt White/Permanent Adhesive |
| 7 | PWIP | Gloss White Inkjet Paper/Permanent Adhesive |
| 8 | FABP | Fabric Friendly Matt White/Permanent A |
| 9 | FMC | Luxury Cream/Permanent Adhesive |
| 10 | MLB | Luxury Brown/Permanent Adhesive |
| 11 | MLG | Luxury Grey/Permanent Adhesive |
| 12 | MLS | Luxury Sand/Permanent Adhesive |
| 13 | MLT | Luxury Terracotta/Permanent Adhesive |
Polyethylene
| # | Product code | Material description |
|---|---|---|
| 1 | PETP | Matt White/Permanent Adhesive |
| 2 | PETC | Matt White/Cryogenic Adhesive (Specialist Adhesive & Material – Extreme Low Temperature) |
| 3 | PETH | Matt White/Cryogenic Adhesive (Specialist Adhesive & Material – Heat Resistant) |
Polypropylene
| # | Product code | Material description |
|---|---|---|
| 1 | PWIP | Gloss White Inkjet/Permanent Adhesive |
| 2 | PCIP | Gloss Clear Inkjet/Permanent Adhesive |
Roll Format
Paper
| # | Product Code | Material Description |
|---|---|---|
| 1 | WTP | Matt White/Permanent Adhesive |
| 2 | WTR | Matt White/Removable Adhesive |
| 3 | RWP | Recycled Matt White/Permanent Adhesive |
| 4 | CSC | Luxury White/Permanent Adhesive |
| 5 | MOP | Block-out/Cover-Up – Matt White/Permanent Adhesive |
| 6 | PWIP | Gloss White Inkjet Paper/Permanent Adhesive |
| 7 | FABP | Fabric Friendly Matt White/Permanent A |
| 8 | FMC | Luxury Cream/Permanent Adhesive |
| 9 | MLB | Luxury Brown/Permanent Adhesive |
| 10 | MLS | Luxury Sand/Permanent Adhesive |
| 11 | MLT | Luxury Terracotta/Permanent Adhesive |
Polypropylene
| # | Product Code | Material Description |
|---|---|---|
| 1 | PWIP | Gloss White Inkjet/Permanent Adhesive |
Thermal Printers
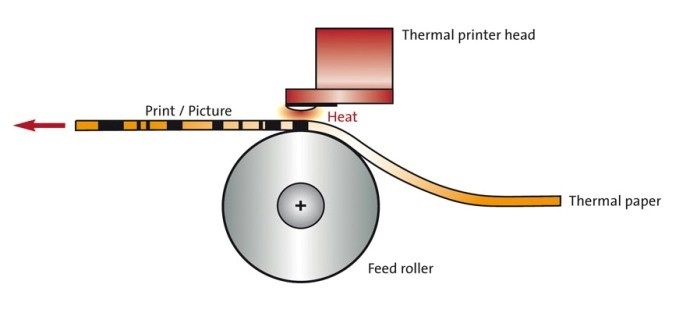
This is a digital printing process which produces a printed image via a heated print-head either applied directly to the paper or Polymer label face-stock, which has been coated with a thermochromic chemical, or by applying heat from the print-head to a resin and/or wax ribbon which then deposits residue from the ribbon onto the label.
Many thermal printers will work in both modes i.e. as a direct and thermal transfer printer, providing that a ribbon has been loaded and these dual functionality models tend to commonly use the letter “T” at the end of the model number to denote that there is also a thermal transfer mode e.g. Zebra GK240D (Direct-Thermal mode only) & GK420T (Direct-Thermal & Thermal-Transfer modes).
Direct Thermal Printing
Direct thermal printers use a chemically treated label material (paper and Polymer) that blackens when
the thermal print-head applies heat to its surface.
Brief Summary
- Requires no ink, toner, or ribbons.
- Prints in black only.
- Sensitive to UV light and age will fade the printed image.
- Cost effective and cheaper than Thermal Transfer because there are no additional consumables (ribbons).
- Minimal maintenance required or replacement of consumables.
- Not recommended for high-contact use.
- Commonly used for short-life barcode and variable data applications such as address labels, barcode labels, delivery labels, name-tag labels, pricing labels, receipt labels, shipping labels etc.
Because heat is used to create the image, by heating the thermal sensitive coating, direct thermal printers don’t require ink, toner, or ribbons. An advantage of this technology is low maintenance costs, as with relatively few moving parts, there is theoretically less to require maintenance and/or replacement and also easy to operate and use.
However, while the foregoing can be interpreted as benefits this printing technology is not without some constraints. Mainly that the image is not permanent and will fade over a period of time. Because the paper is heat-sensitive, additional heat or excessive light can cause the entire paper to darken, rendering any text unreadable and barcodes non-scannable. For this reason, direct thermal printing is mainly used for labels with a limited period of usage i.e. POS, delivery and shipping labels etc. Another consideration is that the image and text created is black, but coloured branding and graphics can of course be pre-printed leaving only the variable data and/or information to be printed in black on a white or coloured background.
Thermal Paper
These papers for use in Direct-Thermal printers are produced to provide rich, legible image and text at all print speeds for excellent readability.
The surface of the paper is coated with a solid-state mixture of a dye and a suitable matrix. The coating includes four different types of chemicals:
Leuco Dyes
These can be in two chemical forms, one of which is colourless. The dyes used in thermal paper are usually Triaryl Methane Phthalide (TMP) dyes or Fluorian dyes or Crystal Violet lactone. These dyes have a colourless Leuco (white or lacking colour) form when crystalline or when in a pH neutral environment, but become coloured upon melting or when exposed to an acidic environment.
Developers
Developers are basically organic acids which are also melted along with Leuco dyes in order to provide more colour. Examples of such developers include Phenols, Sulfonyl Urea’s and Zinc salts of substituted Salicylic acids.
Sensitizers
Sensitizers are also added to the paper surface to optimize the colourisation temperature and to facilitate mixing of developers and Leuco dyes upon melting. Sensitizers are commonly simple Ether molecules.
Stabilizers
Stabilizers are added to the layer of glaze formed by the Leuco dye, developer and sensitiser and prevent the dyes from returning to their original colourless, crystalline forms when stored in hot or humid conditions.
In addition to the thermochromic coating explained above thermal papers can also have protective coatings over this to protect against abrasion (the heat generated from which is sufficient to darken the paper), grease and oils from foodstuffs. This is called a “top coat” and provides improved resistance and protection to the label and the printed information.
Direct Thermal – Label Material Options
Roll Format
Paper
| # | Product Code | Material Description |
|---|---|---|
| 1 | TEP | Matt White/Permanent Adhesive |
| 2 | TEFP | Matt White/Freezer Adhesive |
| 3 | TSP | White Semi-Coated/Permanent Adhesive |
Polypropylene
| # | Product Code | Material Description |
|---|---|---|
| 1 | TWPP | Matt White/Permanent Adhesive |
Thermal Transfer Printing
With Thermal Transfer printing and printers, the thermal print-head instead of applying heat directly to a thermochromic coated surface, the heat is applied to a resin based or wax ribbon which is melted to the label surface and the ink absorbed into the label material.
Brief Summary
- Ribbon required for printing
- Different colour ribbons provide colour options
- The printed image should not age and fade
- The wax and/or resin image is usually durable and resistant to chemicals and temperature.
- Good reproductive quality
- Compatible with a large range of label face-stocks
- Commonly used for product ID’s, asset and inventory labels
Because environmental factors will not alter the print quality, this type of technology is known to create a very strong printed area that should withstand extreme temperatures and contact with chemicals. This print method is recommended for labels that need to last longer than six months.
In contrast to Direct Thermal printing Thermal Transfer printing provides the ability to use spot-colours via the change of ribbon. Because the label face-stock does not require a pre-coated surface like Direct Thermal this print method is also very versatile in terms of the label materials that can be used.
Thermal Transfer – Label Material Options
Roll Format
Paper
| # | Product Code | Material Description |
|---|---|---|
| 1 | WTP | Matt White/Permanent Adhesive |
| 2 | WTSP | Matt White/Super Permanent Adhesive |
| 3 | WTR | Matt White/Removable Adhesive |
| 4 | RWP | Recycled Matt White/Permanent Adhesive |
| 5 | CSC | Luxury White/Permanent Adhesive |
| 6 | MOP | Block-out/Cover-Up – Matt White/Permanent Adhesive |
| 7 | FABP | Fabric Friendly Matt White/Permanent A |
| 8 | WASP | Aluminium Back-Coated – Matt White/Super Permanent Adhesive |
| 9 | SGP | Semi-Gloss White/Permanent Adhesive |
| 10 | HGP | High Gloss White/Permanent Adhesive |
| 11 | FQP | Pearlescent Finish/Permanent Adhesive |
| 12 | GDP | Matt Gold Metallic Finish/Permanent Adhesive |
| 13 | SRP | Matt Silver Metallic Finish/Permanent Adhesive |
| 14 | CBSP | Bright Silver Metallic Finish/Permanent Adhesive |
| 15 | BEP | Matt Blue/Permanent Adhesive |
| 16 | GNP | Matt Green/Permanent Adhesive |
| 17 | RDP | Matt Red/Permanent Adhesive |
| 18 | YWP | Matt Yellow/Permanent Adhesive |
| 19 | FGNP | Fluorescent Green/Permanent Adhesive |
| 20 | FORP | Fluorescent Orange/Permanent Adhesive |
| 21 | FPNP | Fluorescent Pink/Permanent Adhesive |
| 22 | FRDP | Fluorescent Red/Permanent Adhesive |
| 23 | FYWP | Fluorescent Yellow/Permanent Adhesive |
| 24 | FMC | Luxury Cream/Permanent Adhesive |
| 25 | MLB | Luxury Brown/Permanent Adhesive |
| 26 | MLG | Luxury Grey/Permanent Adhesive |
| 27 | MLS | Luxury Sand/Permanent Adhesive |
| 28 | MLT | Luxury Terracotta/Permanent Adhesive |
| 29 | BPP | Brown Parcel/Permanent Adhesive |
Polyethylene
| # | Product Code | Material Description |
|---|---|---|
| 1 | PEWP | Matt White/Permanent Adhesive |
| 2 | PEOP | Block-out/Cover-Up – Matt White/Permanent Adhesive |
| 3 | PETC | Matt White/Cryogenic Adhesive (Specialist Adhesive & Material – Extreme Low Temperature) |
| 4 | PETH | Matt White/Cryogenic Adhesive (Specialist Adhesive & Material – Heat Resistant) |
Polypropylene
| # | Product Code | Material Description |
|---|---|---|
| 1 | MWP | Matt White/Permanent Adhesive |
| 2 | PGWP | Gloss White/Permanent Adhesive |
| 3 | PGCP | Gloss Clear/Permanent Adhesive |
LABEL SENSORS
There are two main types of sensors currently used in roll label printers to detect the beginning and end of the labels. Which are optical or photoelectrical sensors able to detect changes in opacity and/or contrast and capacitive or ultrasonic sensors that detect changes in thickness between the label and the roll backing.
Optical/Photoelectrical Sensors
Optical or photoelectrical sensors are very versatile non-contact sensing devices. The reliability of photoelectric “eyes” or “sensors” took a giant leap forward in the early 1970s when the light emitting diode (LED) replaced the fragile incandescent light source.
This solid-state light source also enables the elimination of most problems previously caused by ambient
room light. Modern pulse modulated photoelectric sensors respond only to the light emitted by their own
light source.
This capability allows the sensor to be very sensitive and responsive to small light changes that occur
to the light beam path between the light source lens and the receiving lens.
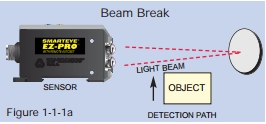
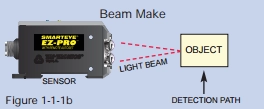
For an object to be detected, it must affect the intensity of the light beam reaching the sensor’s light
detector in one of two ways:
The object must break or diminish an existing light beam path between the light source lens and receiver
lens — Beam Break mode.
The object itself must diffuse or reflect the light beam to the receiving lens — Beam
Make mode.
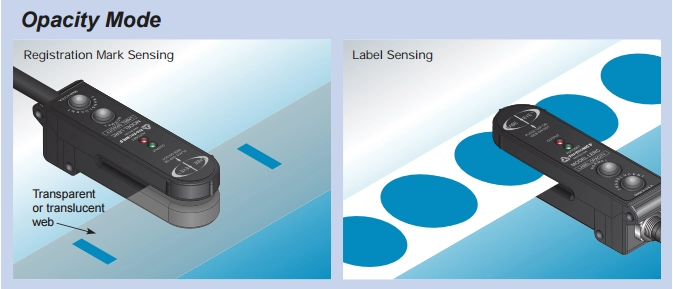
Gap Sensors
Gap sensors are an excellent choice to sense a distinguishing change or object on a continuous web or
roll of label materials. By using opacity mode sensing techniques that utilise a light source capable of
penetrating through the web of materials, gap sensors can register slight contrasting light level
changes and produce an output signal for a specific machine operation.
A significant advantage of opacity mode sensing with gap sensors is that end users do not need to be
concerned with web flutter or ambient light, including strobe flashes. Depending on what you are trying
to sense, opacity mode sensors can give you the desired output signal to perform machine functions.
Typical applications include sensing labels on a roll, sensing registration marks on printed packaging
material, and splice detection on continuous webs of material.
Since opacity mode sensing distinguishes the light level change as light passes through a web of
material, the web must be translucent or transparent. Most webs of packaging material such as film,
metallized films, and paper do allow light to pass through. Opaque materials such as aluminium foil does
not allow light to pass through and, therefore, cannot be used in opacity mode sensing.
The different sensing options involved are all optical. They can either detect a gap, a hole or a
black-block line that is printed for the sole purpose of sensing. These are required to trigger the
start of each label and printing within the set print area of the label. If these are not correctly set
it will cause printer error or incorrect print placement.
Label Gap
Between each die cut label, the waste material is typically stripped away leaving behind what is called a
“label gap.” The carrier or liner supporting the label is usually less opaque than the label and liner
together. Special transmissive sensors read the opacity changes where one label ends and a new label
begins. Label gaps are commonly 2mm – 3mm but can also vary due to automatic label application equipment
and additions such as perforations between labels.
If there is not enough contrast between a label and its liner, then either not enough light will pass
through for the printer to find its “top-of-form” or in the case of transparent labels too much light
may pass through the label. Sometimes you can recalibrate the sensors to adjust to a new liner;
otherwise you will have to choose another way to detect the labels.
Slot or Notch
To create more contrast, you may need slots or side notches cut in the liner. Before deciding whether to
use slots or notches, you will need to determine whether your sensors are “fixed” and locked into one
position in your printer or if they are “movable.” Fixed sensors are commonly located either to read the
very edge of a label roll or in the centre. Movable sensors can be located anywhere across the web to
give you much more flexibility as to where you can locate your cut outs.
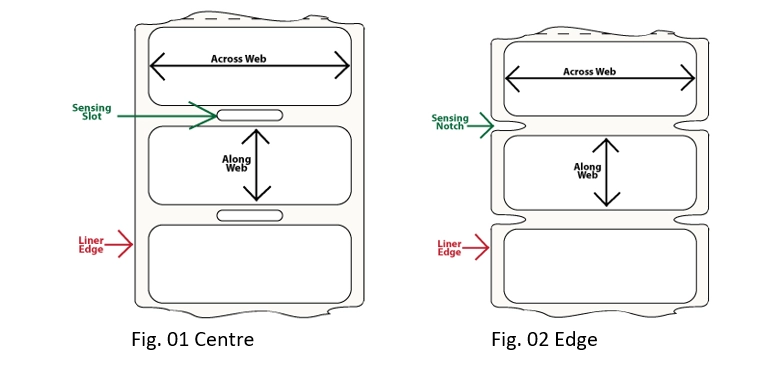
Sensing slots are narrow oval holes often centred in the liner between labels as shown in Fig. 01 above and usually require larger-than-normal label gaps. Because trying to cut and remove a tiny slot from a normal 2mm – 3mm gap is difficult, especially if you also have perforations between labels.
Sensing notches are cut out at the edge of the liner as shown in Fig. 02 above and may not require a larger gap. Not only are notches used with labels on brown or highly opaque liners, but also when working with tag materials that have no liner or label gap. This explains why you often see hang tags with perforations between each tag and four rounded corners that create those notches.
The size, shape and location of a sensing slot or notch is dependent on your printer specifications. Slots and notches typically require special cutting tools. Subject to the size of your label gap, you may also need a new label tool which adds to your initial investment but if this is your printer sensor requirement, it will make your label printing much easier.
Black-Block Mark
Some label printers may also have a “reflective” sensor that relies on black-block registration lines or
marks printed on the back of the label liner. The width of the black mark is synchronized with the label
size to tell the printer when to print label to label. Black marks are particularly useful when labels
or tags are “butt cut” and separated only by a perforation or face cut. Since we will have to print the
black marks for you, this sensor method does add to the cost of supply.
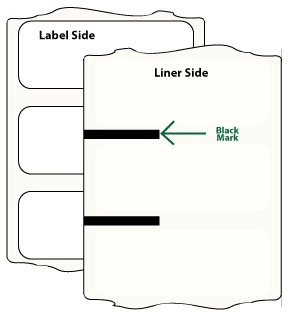
NOTE: Black marks, sensing slots or notches are usually necessary when printing clear labels where there
is absolutely no contrast between the labels and liner.
Other examples of black-block registration marks on the back of the label liner material:
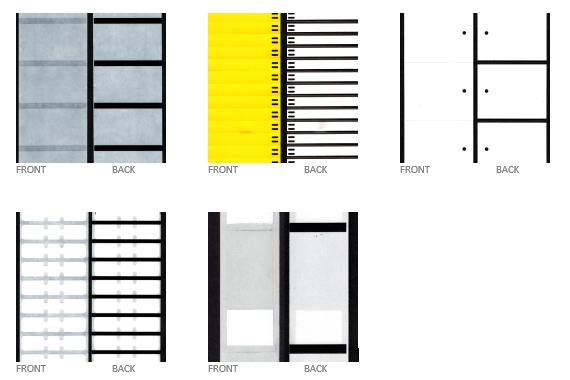
None
The requirement for no means of label detection e.g. gap, slot, notch or line, is only associated with continuous media, often referred to as “continuous roll” printing. Which is a non-converted/cut label material printed upon first and cut to label size subsequently. In this format the printer sensor will only be used to detect the beginning and end of the roll, it will not determine the print area which can therefore be variable with the print for different label sizes being produced on the same roll.
If your printer requires a black-block registration mark you can select this option when ordering labels
online.
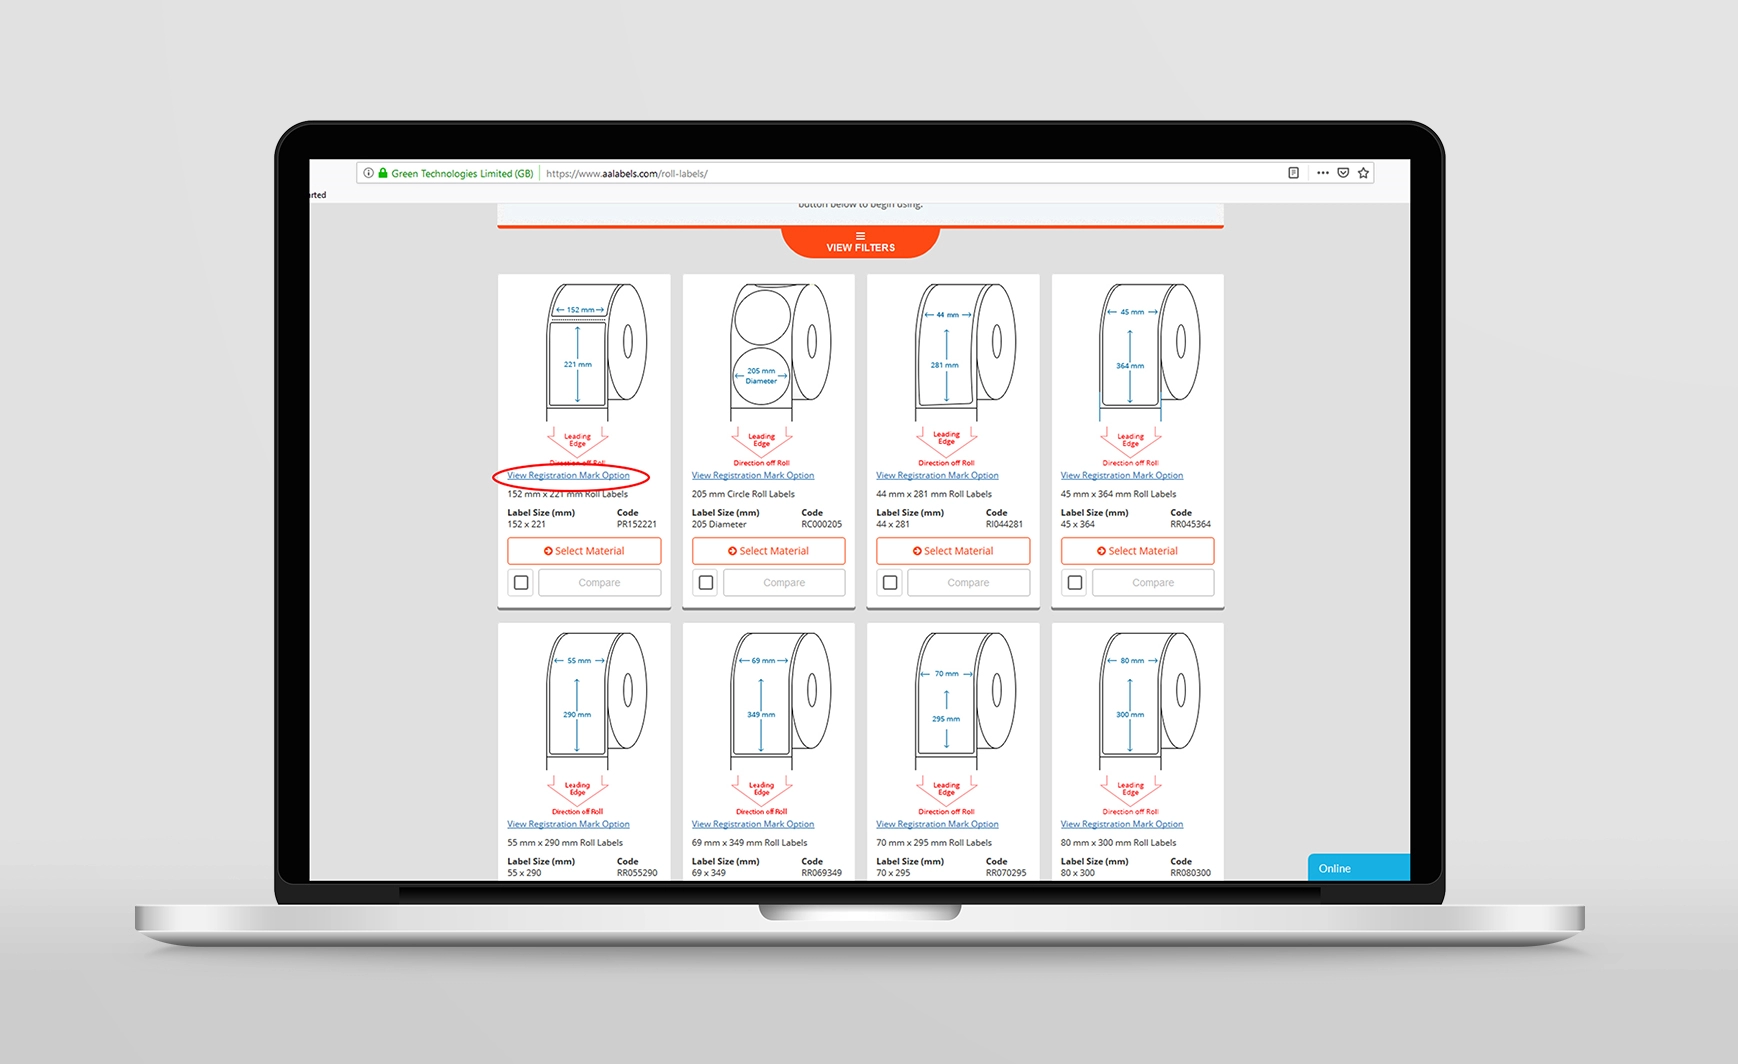
Click on the “View Registration Mark Option” and check the box to confirm that you require a black
registration mark option.

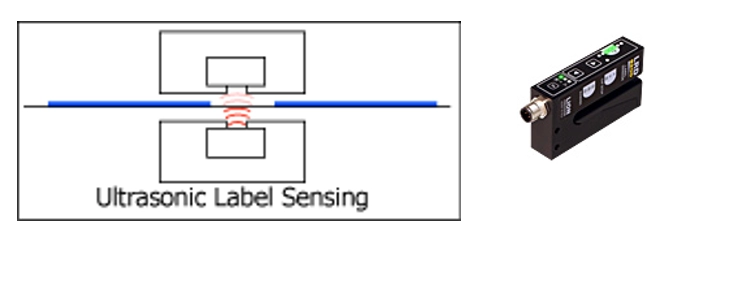
Capacitive & Ultrasonic Sensors
These new generation sensors use capacitive or ultrasonic technology, both of which are optics-free to
measure distance and detect differences in the label height relative to the backing liner and therefore
detect labels that optical sensors cannot i.e. clear labels on a clear liner or opaque labels on an
opaque liner.
Sensors engineered using capacitive or ultrasonic technology have no sensitivity to colour or contrast
This improved sensor technology in label printers also makes the process faster and even more accurate.
How A Clear Label Sensor Works
Capacitive Clear Label Sensing
Capacitive sensors use an electric field to sense the amount of material in the sensor. The electric field exists in the gap between a sensing element in the top of the sensor and the grounded baseplate of the sensor. Web material placed in that gap changes the way the electric field behaves — more material changes it more. The electronics in the clear label sensor can sense these changes in the electric field and this makes capacitive label sensors the most precise label sensors on the market.
Differential Capacitive Clear Label Sensors
Differential sensing is achieved by using two sensing elements in the top of the sensor creating electric fields to the baseplate. When a label is in the sensor, both electric fields behave the same. When a gap enters the sensor, one of the electric fields over the gap changes but the other doesn’t. The sensor electronics detect this difference and signal the presence of a label to the print controller. This type of sensor only sees changes in thickness. For this reason, the sensor rarely needs adjustment because it doesn’t care if the label is thick or thin — it only sees the changes.
Because of the way metallic materials interact with electric fields, if metallic artwork such as a foil
logo enters the sensor, the sensor sees many differences between the two sensing elements as the artwork
travels through the sensor. For this reason, labels using any metallic materials require a different
sensing approach as set-out in the single-ended sensor version explained below. 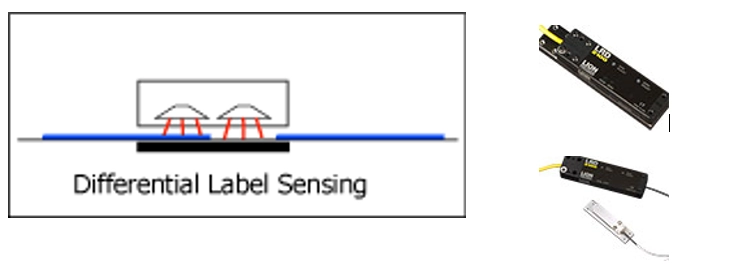
Single-Ended Capacitive Clear Label Sensors
As the title above suggests this type of capacitive sensor has only one sensing element. It measures the absolute thickness of the material in the sensor. This type of sensor is more likely to require an adjustment between different labels in order to set the initial thickness measurement. After that, the sensor triggers the controller when the thickness exceeds a certain point; this point is set to trigger when the additional label thickness is added to the liner thickness. Once the thickness exceeds the trip point, any metallic material is ignored by the sensor because it only makes the label look thicker, but the sensor has already triggered.

Ultrasonic Clear Label Sensors
Ultrasonic sensing works much like single-ended capacitive sensing except instead of an electric field,
it uses high-frequency sound energy. A transmitting transducer (“speaker”) in the base of the sensor
transmits sound to a receiving transducer (“microphone”) in the top of the sensor. The label web reduces
the amount of sound reaching the receiver. The thicker the web, the less sound at the receiver. The
sensor electronics measure the sound pressure at the receiver and triggers the control when a label edge
is detected. This technology has no sensitivity to metallic materials.
This is the latest application of technology and type of clear label sensor, but not necessarily the
most reliably accurate for high speed printing, although accuracy is measured in parts of a millimetre.
See the summary analysis below for more details.
Clear Label Sensors & Print/Application Speeds
Label sensor performance is a measurement of how accurately the sensor detects the edge of the label and
how that accuracy is affected by speed. Label sensor performance is one consideration in determining
which printer and sensor is best for your printing requirements.
Similarly, when used with automatic label application equipment, how accurately a label is located on a
product and/or package is determined by many other factors like the mechanics of the machine and the
other sensors responsible for detecting the package position. But label placement accuracy will never be
better than the label sensor’s ability to accurately locate the label edge.
Overview
Capacitive label sensors are far faster and more accurate than any other label sensor technology
regardless of whether the label is clear or not clear.
The charts below show the label location (registration) of 240 consecutive labels as detected by
different technology sensors. A single bar down the centre of each chart indicates all 240 labels were
accurately placed within ±.0.05 mm. Other bars indicate how many label placements varied (how tall the
bar is) and how far they varied (how far the bars are from the centre of the chart).
Reading the Label Sensor Accuracy Charts

Optical Sensors
Optical sensors are perfectly accurate at low speeds. At higher speeds, their accuracy degrades a small amount. Optical sensors cannot detect clear labels. Choose a roll label printer with this type of sensor if you never use clear labels, or are going to use black-block registration marks.
 Within
±0.1 mm @ 70 m/min: 100%
Within
±0.1 mm @ 70 m/min: 100%
 Within
±0.1 mm @ 220 m/min: 68%
Within
±0.1 mm @ 220 m/min: 68%
Differential Capacitive Sensors
Capacitive label sensors are extremely accurate at all speeds and differential capacitive sensors have
extremely stable setups and require little adjustment.
Any metallic inks or other metallic materials will interfere with the sensor’s performance and black
inks with a high carbon content can also be a problem.
Choose a roll label printer with this sensor technology if accuracy is important and if you use clear
labels but never labels with any metallic materials or metallic inks.

Within ±0.1 mm @ 70 m/min: 100%
Within ±0.1 mm @ 220 m/min: 100%
Ultrasonic Label Sensors
Ultrasonic sensors have a great advantage of detecting the broadest range of materials. But they are the
least accurate of all label sensor technologies. Their accuracy is directly related to web speed and
accuracy continually, although minimally decreases as speed increases.
Choose a roll label printer with ultrasonic sensor technology when you want to be sure you can detect
any type of label and you can tolerate the registration inaccuracies, especially at higher speeds.
 Within
±0.1 mm @ 70 m/min: 25%
Within
±0.1 mm @ 70 m/min: 25%
 Within
±0.1 mm @ 220 m/min: 12%
Within
±0.1 mm @ 220 m/min: 12%
Source: Lion Precision© Technical Library Ref. Label 0041 2015
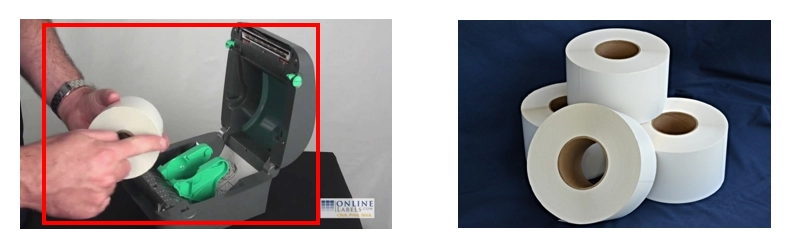
LABEL ROLL – CORE SIZE
The roll label core is a cardboard like spool that the labels are wound wrapped around so. they can be
mounted and fed through your label printer. When shopping for labels on a roll you will need to check
the exact core size, or range of core sizes applicable for your label printer.
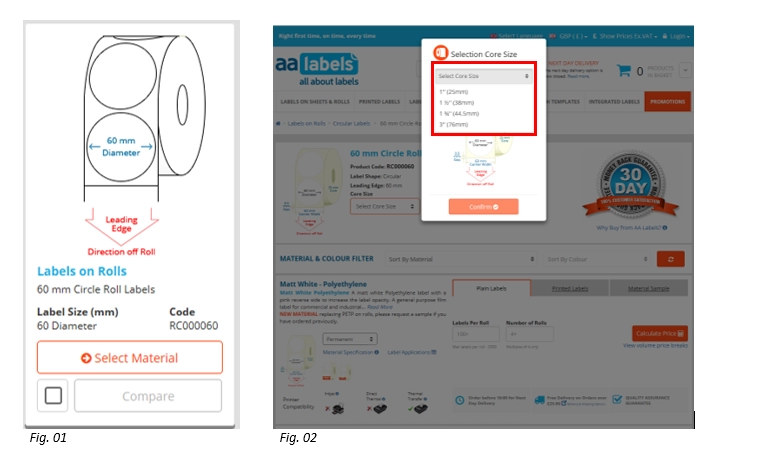
At AA Labels we have a range of 4 common and standard core sizes to select from:
25mm (1”)
38mm (1½”)
44.5mm (1¾”)
76mm (3”)
When ordering your labels on rolls via our website upon selecting the shape and size of your labels you
will then need to select the label material that you want (Fig. 01) and at this point you will be asked
to select a “core size” before proceeding (Fig. 02).
Once you have selected the roll core size suitable for your printer from the drop-down options available
you can then browse the material options available by scrolling the page or refine your search using the
on-page filter at the top of the page (Figs 03 & 04).
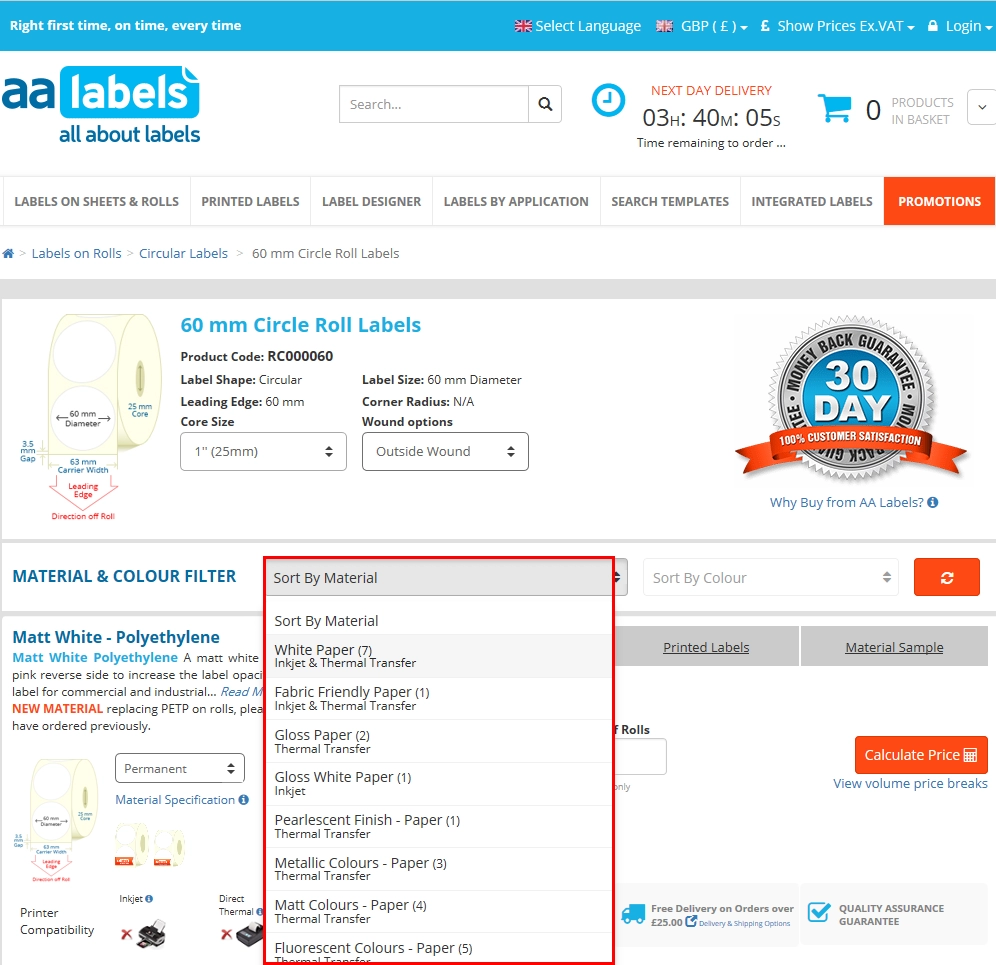
Fig. 03
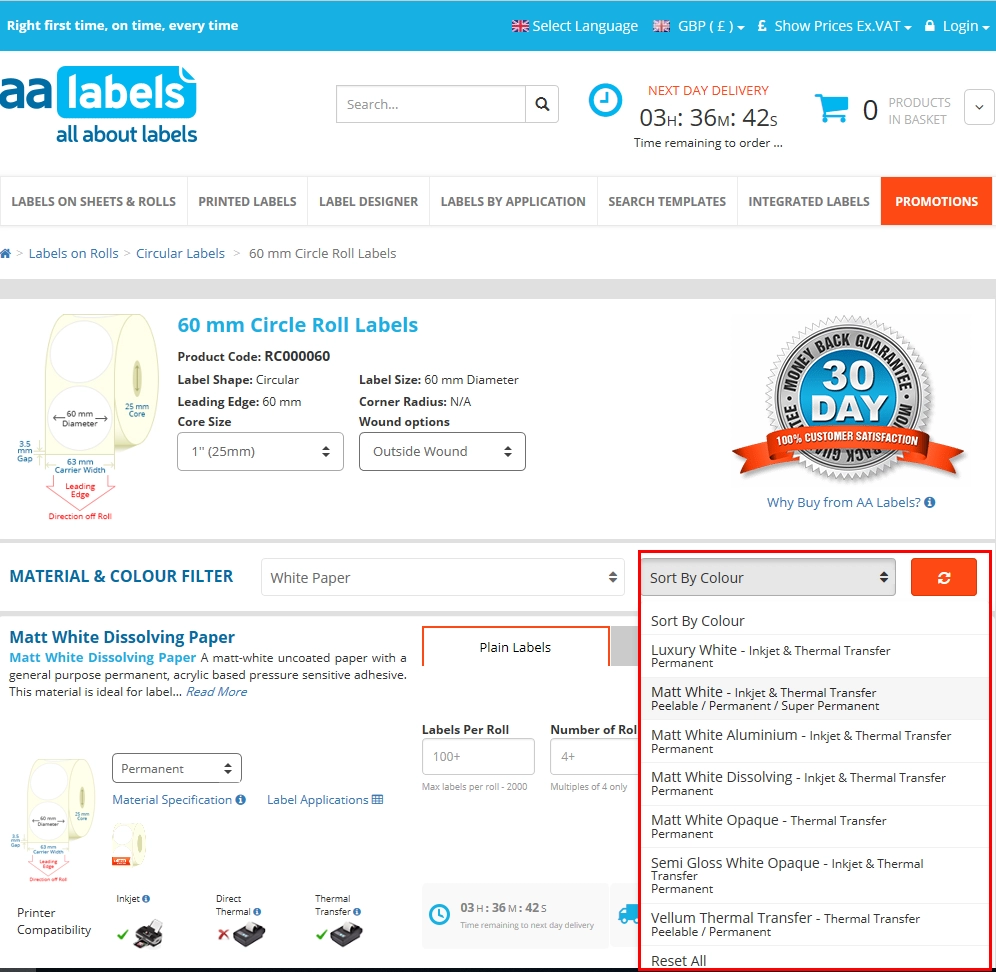
Fig. 04
Once you have specified the label shape, dimensions and material you are ready to proceed to enter the number of labels required and obtain a price.
LABEL ROLL – OUTER DIAMETER
Each roll has a recommended maximum quantity of labels per roll based on the roll core size selected, the label size and the compactness and rigidity of the finished roll size. You will also need to specify the number of labels per roll and the number of rolls based on the quantity of labels required and the multiple of rolls produced.
For example, a 60mm circular label is produced 4 across on the convertor and slit into 4 rolls and is
therefore available to order only in multiples of 4. If the total requirement for this label was 1,000
then you would enter 250 labels per roll and a multiple of 4 rolls (the multiple is always shown for
guidance) as shown below (Fig. 05).
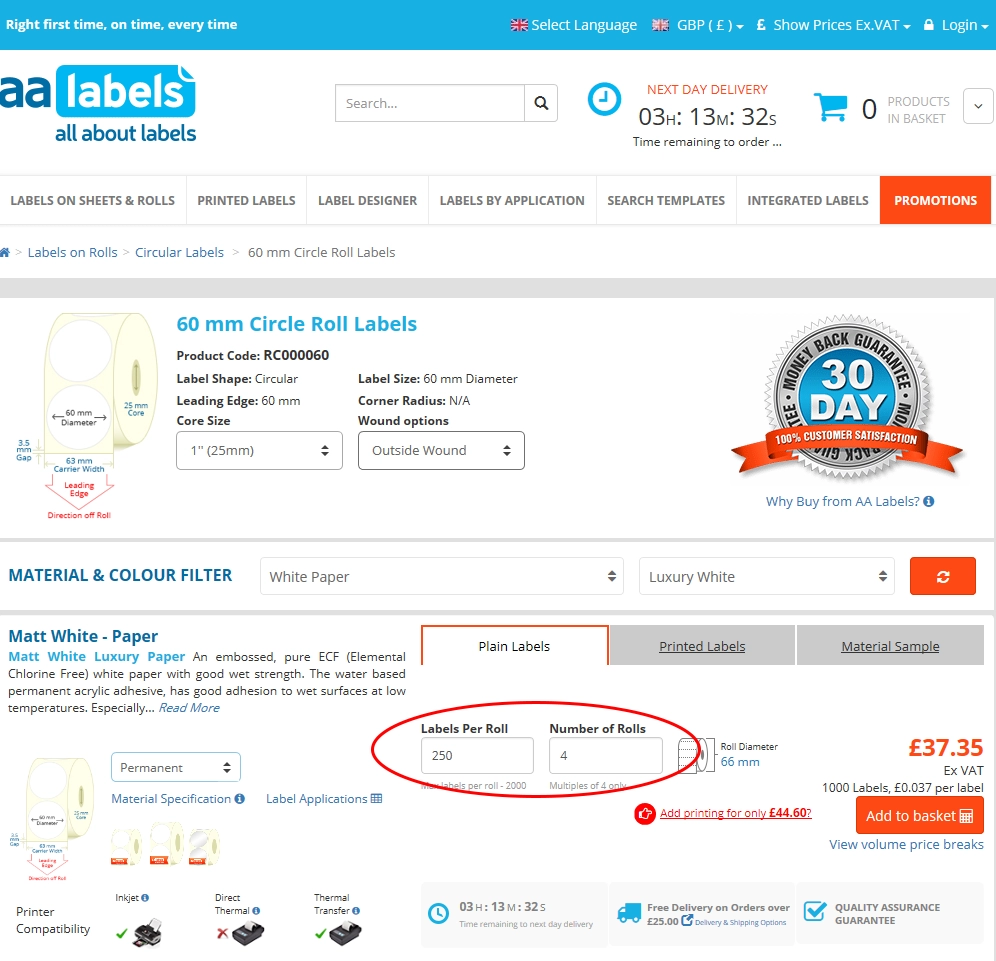
Fig. 05
At this point having entered the quantity you will receive information on the roll diameter as also shown above (Fig. 05) and it is important to check with your printer data sheet or user manual that the overall roll diameter does not exceed the size of roll that can be used in the printer.
SEARCH BY THERMAL PRINTER
If you are buying labels for use with a thermal printer (Direct Thermal and/or Thermal Transfer) there is
also a specific search function on the website for this, which can be found in the main menu at the top
of the page (Fig. 06).
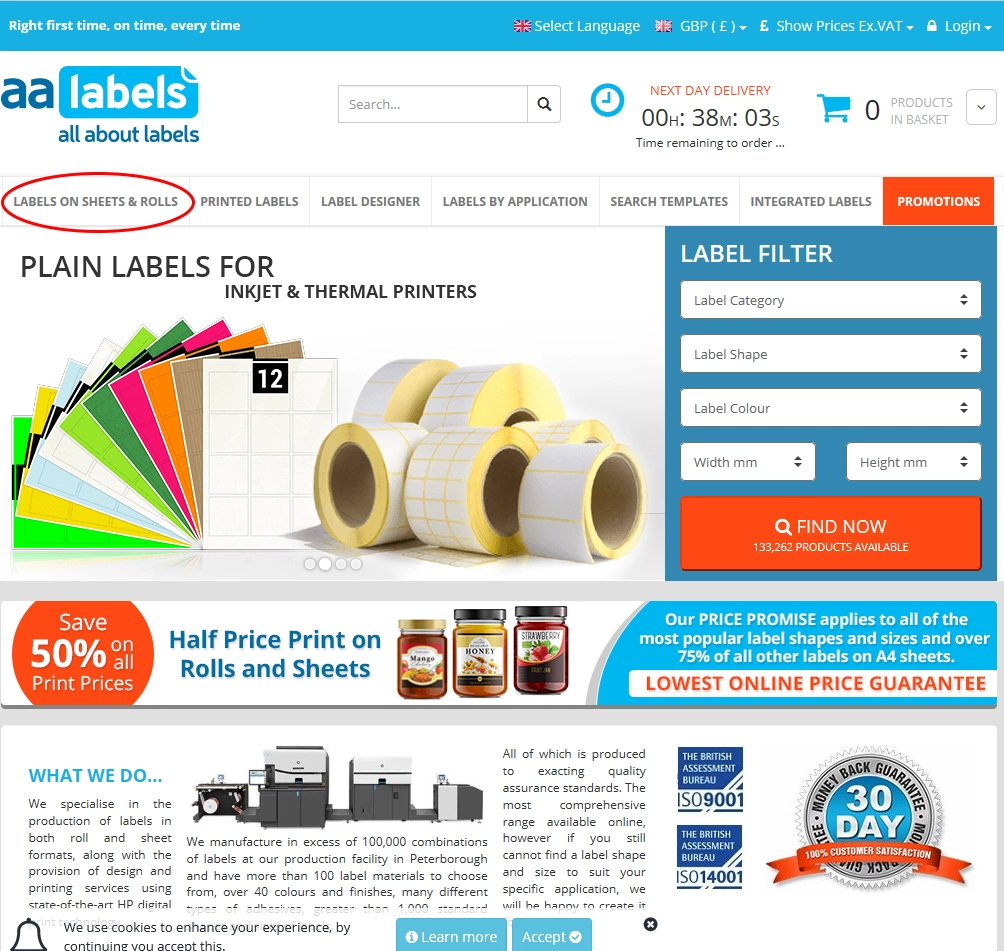
Fig. 06
From the drop-down menu that opens with a mouse-over function, select “Search by Thermal Printer Model”
under the heading “Labels on Rolls” (Fig. 07).
Fig. 07
This then allows you to search further by printer manufacturer and find your printer model (Fig. 08).
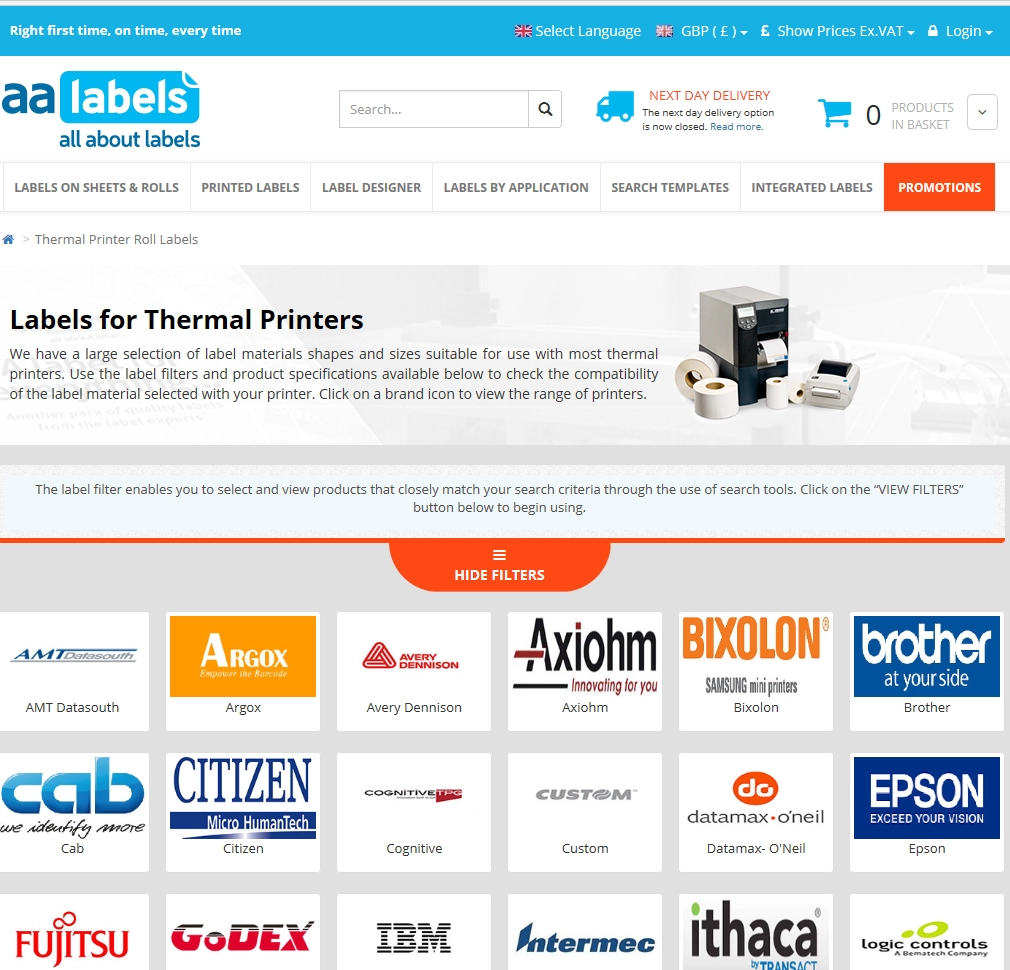
Fig. 08
By selecting and clicking on a printer model manufacturer and selecting the printer that you require
labels for will provide you with useful information such as the roll core size required and the maximum
roll diameter for the printer, along with the maximum label and print width and access to downloadable
versions of the Product/Technical Data Sheet and User Manual (Fig. 09).
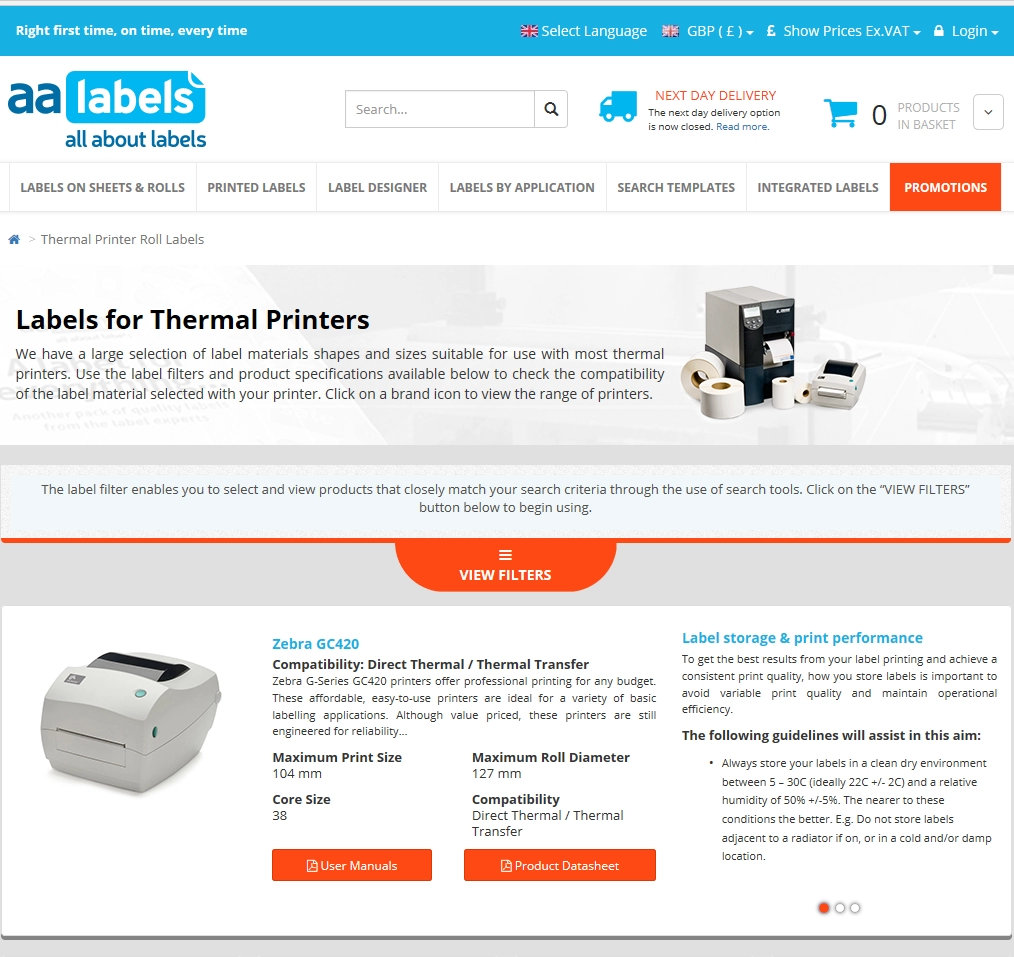
Fig. 09
You can then use the Label Filter shown above to select the label shape and size and proceed as previously described to select the label material, quantity of labels and the number of rolls.
PRINTER COMPATIBILITY
When searching by the Thermal Printer route to label selection the printer compatibility will be shown in
the summary at the top of the page (Fig. 09) but in all circumstances the various search methods will
converge upon the materials page where there is another printer compatibility check available via the
on-page printer icons (Fig. 10).
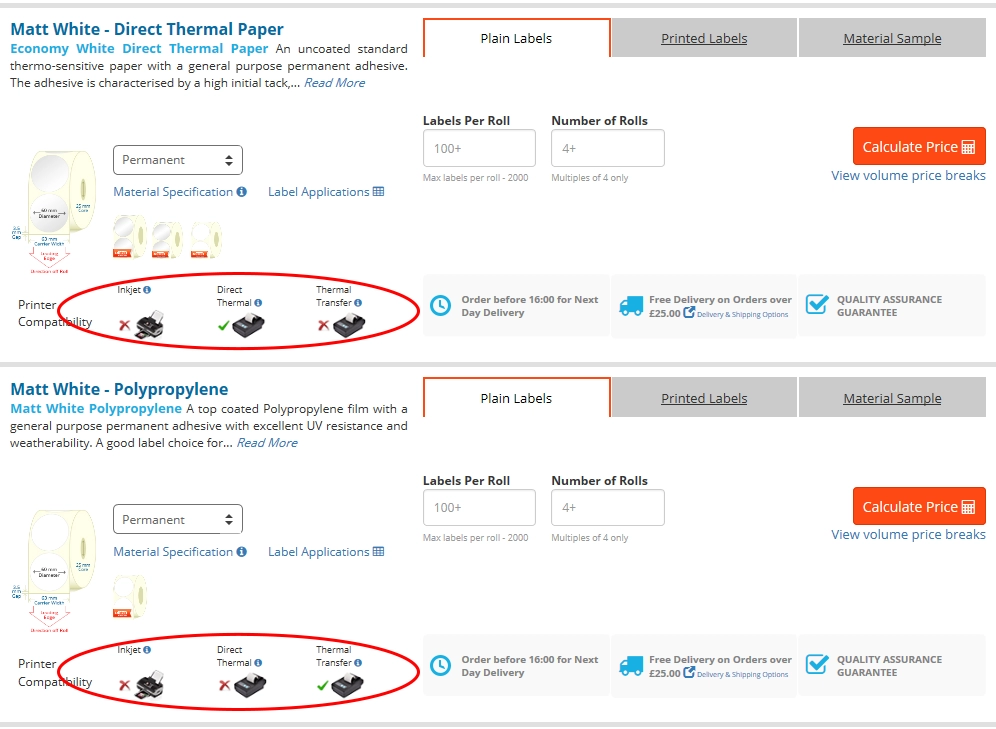
Fig. 10
THE PROTECTION OF LABEL ROLLS IN TRANSIT
Fulfilment of roll label orders always involves the secure packing and protection of the rolls to minimise movement in transit and the potential for abrasion to the surface of the labels. Which is important for all labels whether plain or printed, but particularly so when transporting labels with a Thermochromic coating for use with Direct Thermal printers as any contact risks resultant black marks on the labels surface from the heat generated in friction.
Therefore, to mitigate against this outcome all labels on rolls are despatched for delivery with additional labels to the quantity ordered on the outside of the roll (one revolution). So that in the event that the outer labels incur scuff-marks these can simply be taken off and discarded.
ASSISTANCE & INFORMATION
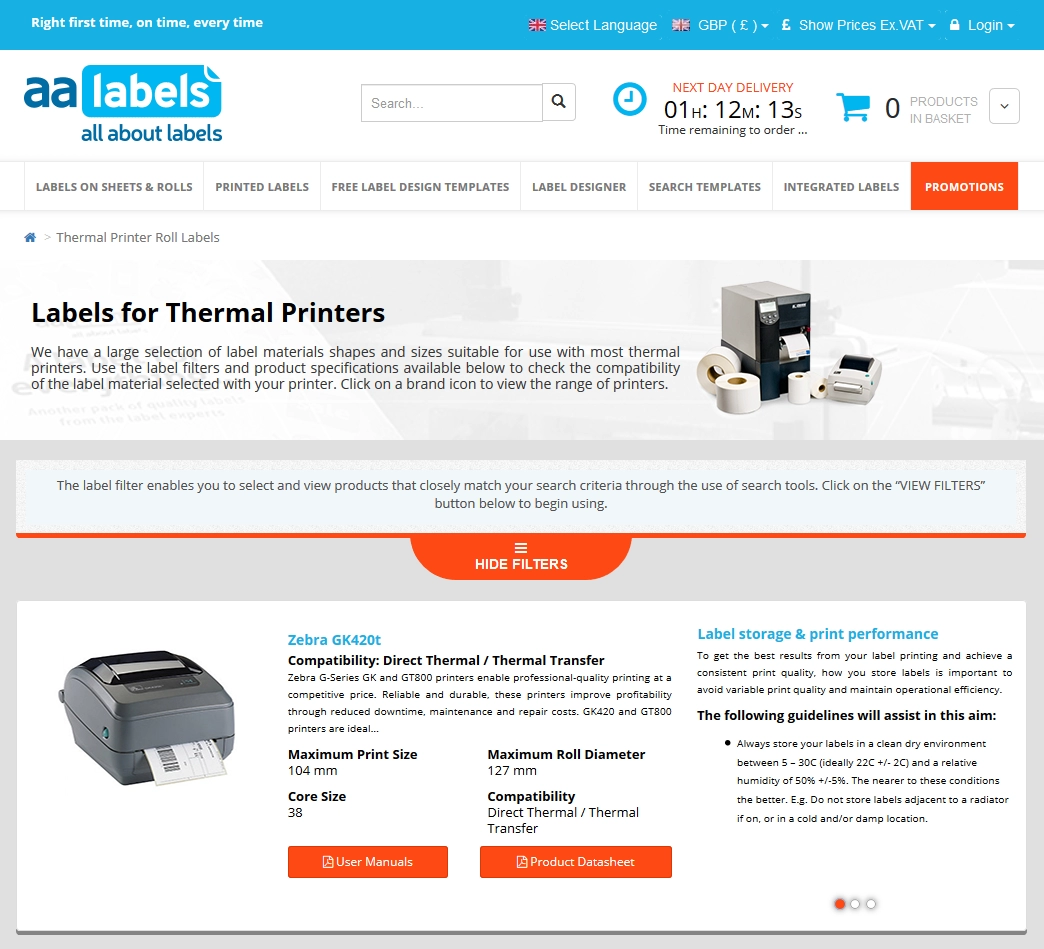
Information about label size, type and printer compatibility can be found on the website within the
“Labels for Thermal Printers” section, along with Product Data Sheets and User Manuals (Fig. 11) to
assist problem solving.
Fig. 11
Product Data Sheets (Fig. 12) and User Manuals (Fig. 13) can be opened in your browser and/or be
downloaded as PDF’s for reference and troubleshooting as needed.
Fig. 12
Fig. 13
We hope that this short summary about ordering plain labels on rolls for your printer has been useful and
if you require any additional assistance and/or information please do not hesitate to contact us via
email or telephone and speak with a member of our customer care team.
Email: customercare@aalabels.com
Tel. +44 (0)1733 588390
Posted in: Label Printing


If you would like to find out more about our cost-effective, short-run labelling and packaging options, for personalisation and promotion. Please contact our customer care team, who will be happy to discuss your requirements and provide advice on the options available.